I have picked up a handful
of fitting hints I should not keep secret!
Sewing should be FUN. That is why we buy and use Lutterloh.
Why not master some great ways to fit your patterns?
When you think about fitting a garment the first thing to consider is:
"what does everything hang off of?"
Starting at my head my next widest part is my shoulders.
All my dresses and tops hang off my shoulders so
why not get that part of the pattern correct every time with a this tool.
My handy tool is a tracing of my neck and shoulders.
I had my daughter trace me with a pencil.
It took a couple of tries with a three year old about.
 This is the paper tracing. It was taped to the wall and needs some touch up
Let's start with getting the shoulder correct.
1) Collect a piece of paper wide enough and long enough to
capture a tracing of your shoulder and neck.
2) Make a straight line down the center of the paper. We just folded ours in half.
3) Tape the piece of paper on the wall at a level you
can stand at and easily be traced from
Stand so you are in the middle of the center line.
Your helpful friend can make sure you are in the center.
Sewing should be FUN. That is why we buy and use Lutterloh.
Why not master some great ways to fit your patterns?
When you think about fitting a garment the first thing to consider is:
"what does everything hang off of?"
Starting at my head my next widest part is my shoulders.
All my dresses and tops hang off my shoulders so
why not get that part of the pattern correct every time with a this tool.
My handy tool is a tracing of my neck and shoulders.
I had my daughter trace me with a pencil.
It took a couple of tries with a three year old about.

Let's start with getting the shoulder correct.
1) Collect a piece of paper wide enough and long enough to
capture a tracing of your shoulder and neck.
2) Make a straight line down the center of the paper. We just folded ours in half.
3) Tape the piece of paper on the wall at a level you
can stand at and easily be traced from
Stand so you are in the middle of the center line.
Your helpful friend can make sure you are in the center.
4) Have someone trace you by holding the pencil straight up. Start at the neck below your ears, trace all the way down your shoulder and slightly onto your arm.
Repeat for the other side.
Don't move one more step......
Have your helper put a nice big dot at your neck just as it turns
to your shoulder (where a neckless chain would rest)
and then at the peak of your shoulder.
To find that raise your arm and feel for the space where the shoulder bends.
Repeat for the other side.
Don't move one more step......
Have your helper put a nice big dot at your neck just as it turns
to your shoulder (where a neckless chain would rest)
and then at the peak of your shoulder.
To find that raise your arm and feel for the space where the shoulder bends.
5) Take down the paper and using a french curve tidy up and smooth out your shape. You can use a marker for this to make a nice dark outline. I put my
Shoulder shape on a piece of cardboard. It gets used over and over again.
Shoulder shape on a piece of cardboard. It gets used over and over again.
Now each time you make a Lutterloh pattern you can lay it over your shoulder shape and see if it fits you properly. If it doesn't use the fix I show you in the photos below.
This will also help you see if the garment is much too wide
across the shoulder or too narrow.

This will also help you see if the garment is much too wide
across the shoulder or too narrow.

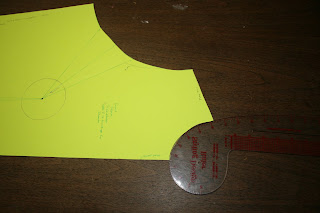
This is the tidied up shoulder that I traced on cardboard.
I also added a red line to note the lowest I'd want a neck line to go.
Might as well check that while I do the shoulder check.

I'm going to use a commercial pattern so you can see it on the white cardboard background. My Lutterloh patterns are all made on White paper.
White on White in photos? I think not.
This is a princess line top I've made before.
We only need the part of the pattern that will hang off our shoulder.


Now for the fun. Lay the pattern on the center line and
match the pattern to the shoulder.
I never put seam allowances on my Lutterloh patterns. I add them on the fabric.
This pattern however has 5/8 seam allowances so I have red penciled them so I can avoid using them. We want to do our measuring on the stitching line.
The pattern is also a multi-size pattern and I am using one of the smaller sizes, so you will see that extra paper.

Here's a nice close look, remember it's a multi-sized pattern so the
paper above the neck mark is the larger sizes not in use.
Hum looks like a lot of fabric I don't need.

I've laid two rulers down. One on the shoulder of the pattern, one on
my shoulder line. It was over 1 1/2 inches different.
That extra fabric becomes a bubble of fabric above my bust.
It makes my armscye too large also if this was a sleeveless top
I'd have a loose arm hole.
This can work both ways.
Your shoulder could be higher than your pattern allows
for and you may need to add fabric.
One important note: If I was going to put in a 1 1/2 inch shoulder pad then I should NOT make this change!
The shoulder pad will take that space.
Maybe I will put in a low shoulder pad
then make a small adjustment in the shoulder.
Ready to correct this problem?

One line horizontal about 2 inches below the armscye.
I use my cutting boards lines to get a nice straight line.
Just mark it with a pen.

2) Make a 2nd pen line vertical from the shoulder
(about 2 inches or so from the armscye)
To the Horizontal line you just made

Note: Before I go any further, because I know this pattern
I have pinned out the extra width in the shoulder.
I will have to add a large bust change but that's another issue.
This pattern is much too far down my shoulder and would look
like a drop shoulder which it is not.
If your bodice hits your shoulder where you want it no change need be considered.

from the bodice pattern.
It will help me correct that extra 1 1/2 inch shoulder problem.
It looks shocking to cut up a pattern but we will put it back together soon!

Click on the photos to see this up close.
Remember I have a seam allowance in the way.
Be sure to match the sewing line to your shoulder with both pieces.
I now have one pattern piece up high and one down
where it should be on my shoulder.
(Because I still need to loose some of the width of this shoulder
I have overlapped the two pieces a little, You may not need this so
slide the lower piece right next to the higher piece butt them
together don't overlap them. When using a Lutterloh pattern I use a size that fits better than this commercial pattern does)

Now draw a nice line across the two pieces.
It should connect the highest point with the lowest.

My top should hang on my shoulder perfectly now!
It's a much better start to have the pattern hanging off the shoulders
correctly before you do anything else.
If you removed/added some from the neck edge (I didn't) then remove/add
that amount from your collar. Don't remove it from the center back, remove
it from the shoulder line. Photo to follow.
Because this was a multi-sized pattern I just folded over the pattern pieces.
With your Lutterloh pattern just cut off the un-needed area.
DON'T FORGET TO REPEAT THIS ON THE BACK PIECE.
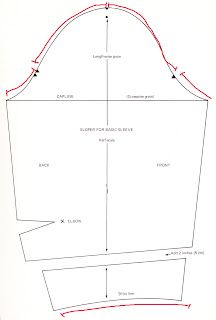
Small adjustments may be needed on the sleeve.
Walk it in the armscye and see if you need to adjust this.
I'll show sleeve adjustment in my next posting.
************************************************
Did that hint give you some ideas?
Well here are some more hints to help make every pattern fit you and your shape.
*******************************************
Let's do some FRENCH CURVE work.


Yes get that curve out and let's learn how to use it to get the fit we want.
By comparing some of our best fitting garments we can transfer
Our French curve shape to the Lutterloh patterns.
Look at all the places you use the French curve in pattern making.
Many of these locations can be checked in our favorite
clothes and used on our Lutterloh pattern.

The French curves have numbers all the way around and down the French curve. These are the numbers we will want to note.
I am using my favorite curve in the photos below.
By comparing some of our best fitting garments we can transfer
Our French curve shape to the Lutterloh patterns.
Look at all the places you use the French curve in pattern making.
Many of these locations can be checked in our favorite
clothes and used on our Lutterloh pattern.
 | |||
| Use the french curve to note your hip shape |
 | ||||||||||
Save your favorite hip shape from your pants or your skirt and use it over and over Check the curve in your crotch to improve fit. CAUTION: The area without red in the crotch should be mostly straight. |

This is where the French curve shines.
Note your favorite necklines
Check your favorite sleeves

Check your Cap and curve
see why you never never like your garments sleeves by comparing the french curve lines with a favorite garment.
The French curves have numbers all the way around and down the French curve. These are the numbers we will want to note.
I am using my favorite curve in the photos below.
HIPS: repeat your hip shape by noting the numbers on the curve that fit your hip shape.

but you can get this shape from a skirt also.
I work from just below the waist band down to just past the widest part of my hip.
REMEMBER: place the French curve on the seam line not the cut edge.

down from my waist. It hasn't mattered if I was skinny or thick,
it's still just 4 inches.
I used the straight edge of the French curve to show you that you only need to measure the curve area, once your leg is straight it is not a french curve area.
If you need to see where the curve ends just lay a yard stick up the straight of your leg and note where it no longer touches the pant.
Measure from there to the waist.
Slide the French curve up and down until you find the perfect match to the shape.
******
1) Find an outfit that fits as you like, a skirt or pair of pants work.
Smooth it out on the table, wrong side out is sometimes a better
way to see what the shape of the skirt is.
Only measure along the stitching line.
2) A French curve will fit any curve but you must move it up and down until it perfectly fits the shape you want to take note of.
3) Write these important fitting numbers on a bright recipe card.
At the waist band bottom what number is on the french curve?
Write it as top #__.
With out moving the french curve note the place were your body
no longer curves but hangs straight.
That would be Bottom #___.
no longer curves but hangs straight.
That would be Bottom #___.
Now when you make a skirt or even a pair of pants you can take your french curve and check that the Lutterloh pattern fits your shape. Match the top number you wrote down to the pattern waist, and the bottom number to where the curve ends. Did your pattern match the French curve? If not trace around the French curve and use the new shape.
This is a quick easy change to make.
REMEMBER measure on the stitching line not the cutting line
This is a quick easy change to make.
REMEMBER measure on the stitching line not the cutting line
********
This little trick works for your neck line also.
I don't like surprises when I make a neckline.
I don't like it to be too loose, or too low or not look perfect.
Take a couple of necklines you really like and using the french curve
do as you did for your hip.

I don't like surprises when I make a neckline.
I don't like it to be too loose, or too low or not look perfect.
Take a couple of necklines you really like and using the french curve
do as you did for your hip.
1. Fold the top or dress in half so you only work with half the neck.
2. Move the french curve on the neck line until the shoulder seam
and the bottom of the neckline match the french curve.
You can see the direction I have placed the curve in the photo above.
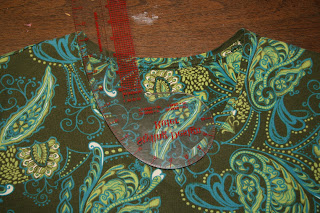 This is a V neck I really like, it isn't straight but curved a bit.
Because it is a V neck I did not fold the top as the V was clearly the center.
It is also a knit so I washed it first to make sure it wasn't stretched out from wearing it.
and the bottom of the neckline match the french curve.
You can see the direction I have placed the curve in the photo above.
REMEMBER: you measure the sewing line not any facings or neck finishes.

Because it is a V neck I did not fold the top as the V was clearly the center.
It is also a knit so I washed it first to make sure it wasn't stretched out from wearing it.
3. Note the number at the shoulder seam as Top #___
Note the bottom of the neck as Bottom #___

But the numbers are Top 12 2/8 Bottom 22
I have only showed you the hips curve and the neckline.
You can use this for the armscye and the crotch of your pants.
I will address those in another posting as there are several issues to show you.
So for now go measure some hips and necks in your favorite outfits. Write the top number on the curve and the bottom number on a master sheet
and put them to use in your pattern making.
Hope this improves all the patterns you
make from here on!
make from here on!
Here is where you can get more information on these techniques.
Using the shoulder slant = Threads fitting DVD Series Torso
Using your french curve=Peggy Sagers DVD Success from the start
http://www.silhouettepatterns.com/html/media.htm
This is a great video that will teach you how to compare all your patterns to the clothes you like to wear. If you struggle to understand sleeves this also answers the questions you didn't know you had. I love this video!
http://www.silhouettepatterns.com/html/media.htm
This is a great video that will teach you how to compare all your patterns to the clothes you like to wear. If you struggle to understand sleeves this also answers the questions you didn't know you had. I love this video!


